


Why Shopify Themes Matter for Your Store
Installing a new theme on Shopify is one of the most significant steps you can take to improve your online store and provide a compelling experience for your customers. A vibrant, user-friendly theme doesn't just look good—it drives engagement and sales. Here’s a quick answer if you're in a hurry:
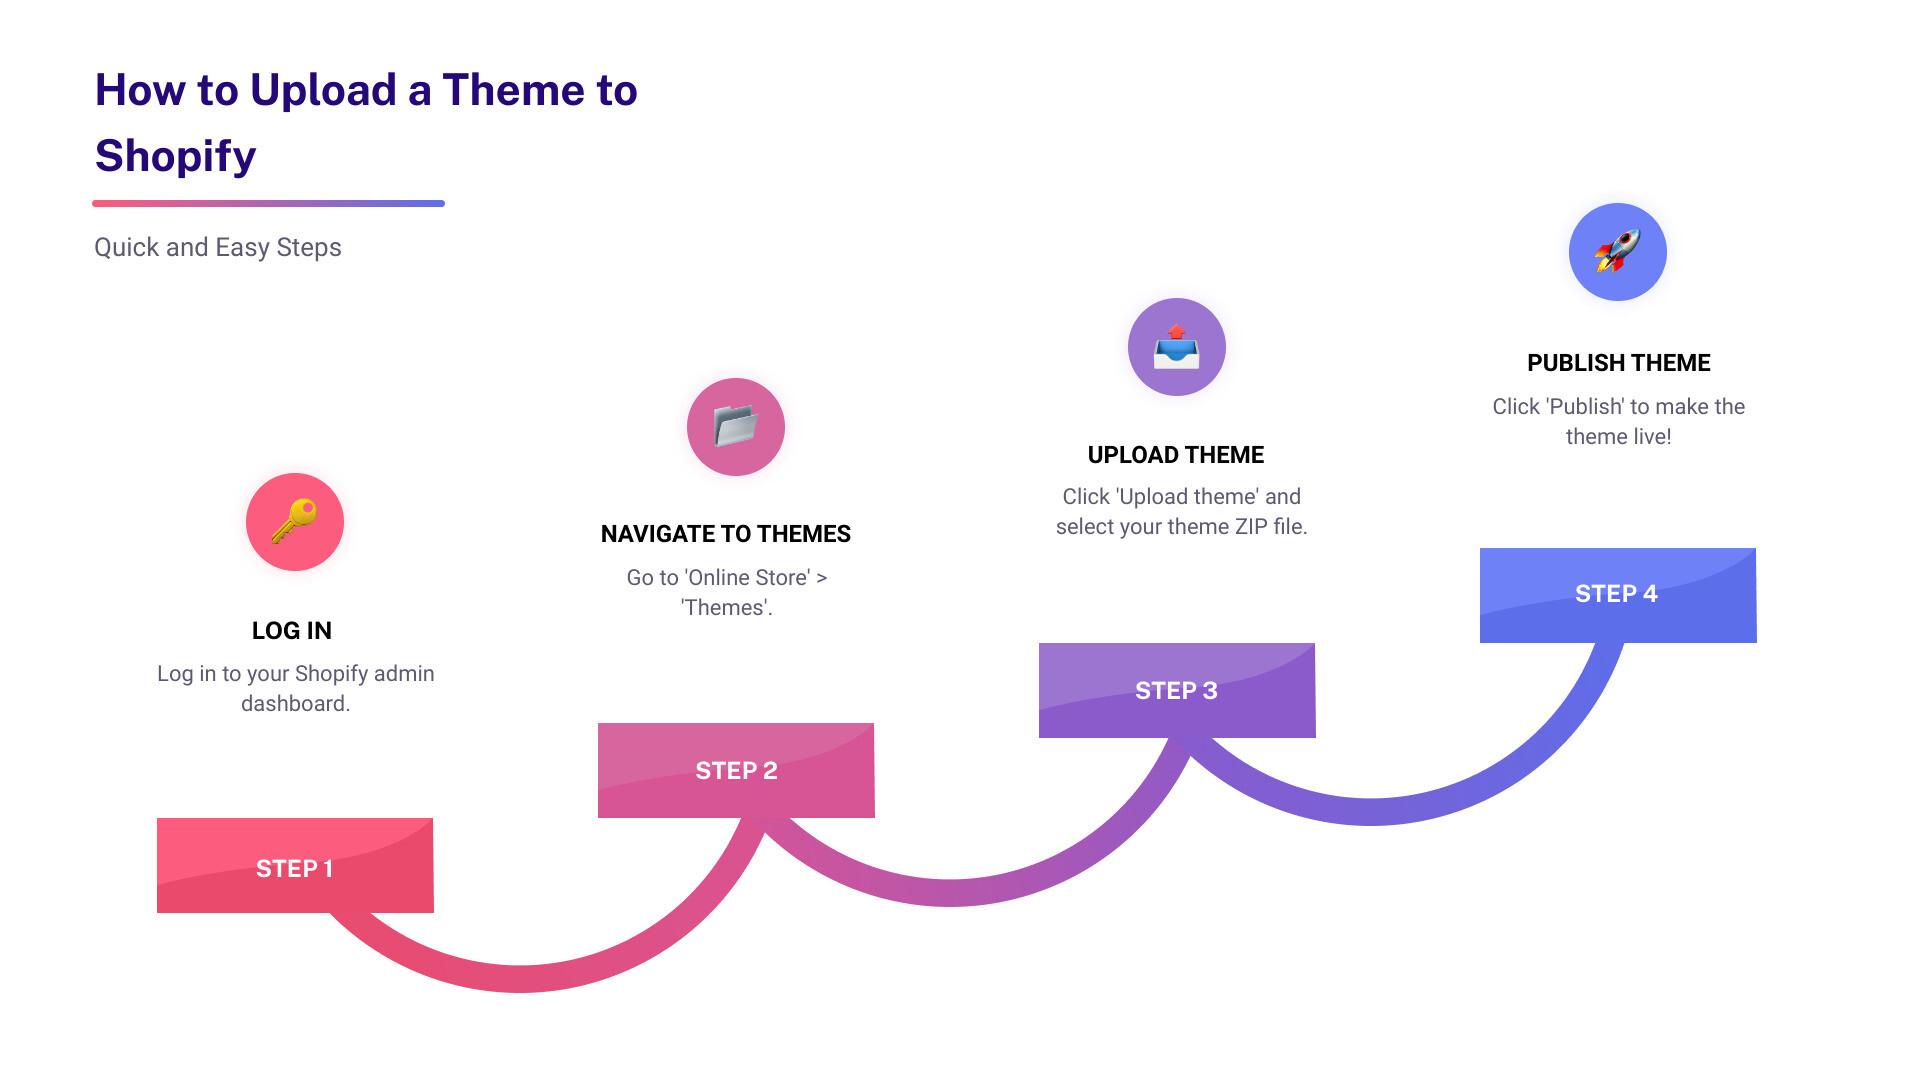
- Log in to your Shopify admin dashboard.
- Steer to "Online Store" > "Themes".
- Click "Upload theme" and select your theme ZIP file.
- Click "Publish" to make it live!
With that out of the way, let's dig deeper.
Themes play a crucial role in your store’s first impression. Imagine walking into a brick-and-mortar store with cluttered aisles and unappealing displays. Most customers would turn right around and leave. The same applies to your Shopify store. A well-chosen theme can make the difference between a visitor bouncing off your site and a visitor converting into a customer.
I’m Steve Pogson, a Shopify Expert and E-commerce Growth Specialist with over two decades of experience. I’ve seen how the right theme can boost sales and customer engagement firsthand. Let's get into the details of uploading a theme to make your Shopify store as attractive and efficient as possible.
Understanding Shopify Themes
Theme Basics
Themes are the backbone of your Shopify store's visual appeal and functionality. Think of a theme as the outfit your store wears to impress visitors. It dictates how your site looks, feels, and operates. A good theme can improve the user experience, making it easier for customers to steer and purchase products.
Key components of a Shopify theme:
- Templates: Layouts for different pages (e.g., homepage, product page).
- Sections: Customizable content blocks (e.g., featured products, testimonials).
- Stylesheets: Define the visual style (e.g., colors, fonts).
- Assets: Images, scripts, and other media files.
Types of Themes
Shopify offers two main types of themes:
- Free Themes: Developed by Shopify, these are perfect for beginners or small businesses with limited budgets. Examples include Debut and Dawn. They come with basic features and are easy to set up.
- Paid Themes: Created by third-party developers, these themes usually cost between $140 and $180. They offer advanced features, better support, and more customization options. Paid themes can help your store stand out and often come with improved functionalities like quick product views and social proof.
Fact: A store using the Booster Theme, a high-converting paid theme, might see an increase in conversion rates due to its advanced features.
Theme Store
The Shopify Theme Store is your go-to place for finding both free and paid themes. It houses a diverse collection of themes custom to different industries and business needs. You can browse themes by category, functionality, or even by specific features you need.
Steps to explore the Shopify Theme Store:
- Log in to your Shopify admin.
- Go to Online Store > Themes.
- Click Visit Theme Store.
- Browse through the themes and preview them to see how they would look on your store.
You can try up to 19 paid themes at the same time. Each one will have a Theme trial label, allowing you to customize and compare them before making a purchase.
Statistic: 88% of shoppers won’t return to a store after a bad user experience. Choosing the right theme is crucial for retaining customers.
By understanding the basics, types, and where to find themes, you’re well on your way to creating a visually appealing and functional Shopify store. Next, we’ll dive into the nitty-gritty of how to upload a theme to Shopify.
How to Upload a Theme to Shopify
Uploading a theme to Shopify might sound daunting, but it's actually straightforward once you know the steps. Whether you're using a desktop or a mobile device, this guide will walk you through each step.
Preparing Your Theme File
Before you start, ensure that your theme file is in the correct format. Shopify requires theme files to be in .zip format. If you have multiple files, compress them into a single .zip file.
File Organization Tips:- Ensure the main theme file is named clearly, like myshop-theme.zip.- Include all necessary subfolders (assets, config, layout, etc.) within the .zip file.- Double-check that the layout/theme.liquid file is present, as missing this can cause upload errors.
Accessing the Shopify Admin
To upload your theme, you'll need to access your Shopify Admin.
- Login: Go to the Shopify login page and log in to your account.
- Steer to Themes: Once logged in, click on Online Store in the left-hand menu, then select Themes.
Uploading from Desktop
- Select File: On the Themes page, scroll down to More Themes and click the Upload Theme button.
- Upload: In the dialog box that appears, click Choose File and select your .zip file from your computer.
- Confirmation: Click Upload. Your theme will now appear on your Theme page in the Shopify admin, ready for installation.

Uploading from Mobile
If you're on the go, you can also upload a theme using the Shopify mobile app.
- App Access: Open the Shopify app on your iPhone or Android device.
- Steer to Themes: Tap the Store section, then go to the Sales Channels page and select Online Store.
- File Selection: Tap Manage Themes and scroll to More Themes. Click the Upload Theme button and a window will pop up.
- Upload Process: In the pop-up window, tap Choose File and select your .zip file from your device. Tap Upload to complete the process.
Your theme will now be visible on the Theme page in your Shopify admin.

With these steps, you can easily upload your theme to Shopify from either a desktop or mobile device. Next, we'll look at how to customize your theme to match your brand's identity.
Customizing Your Shopify Theme
Customizing your Shopify theme is like decorating your store's window display. It’s your chance to make your brand shine and create a welcoming experience for your customers. Let's break down the steps to make your theme truly yours.
Theme Editor
The Theme Editor is your main tool for customization. It allows you to preview your theme, tweak settings, and adjust the layout—all without touching a line of code.
- Accessing the Theme Editor:
- From your Shopify admin, go to Online Store and then Themes.
- Find the theme you want to customize and click Customize.
- Customize Button:
- The Customize button opens up the Theme Editor, where you can make changes to your theme's appearance and layout.
- This interface is user-friendly, making it easy to adjust settings like colors, fonts, and section placements.
Brand Colors
Your brand colors are essential for creating a cohesive look. In the Theme Editor:
- Colors Tab: Steer to the Colors tab to change the color scheme.
- Color Picker: Use the color picker to select your brand colors. Ensure consistency with your logo and other marketing materials.
Previewing Your Theme
Before making your theme live, you should always preview it.
- Preview Options:
- Click the Actions button next to the theme and select Preview.
- This allows you to see how your store will look to customers.
- Share Preview:
- You can share a preview link with team members or friends to get feedback.
- Simply click Share preview in the Theme Editor and copy the link.
- Feedback Collection:
- Collect feedback from your team or trusted customers. Make necessary adjustments based on their input for a better user experience.
Publishing Your Theme
Once you’re satisfied with your customizations, it’s time to publish your theme.
- Switch Themes:
- To switch to your new theme, go back to the Themes section in your Shopify admin.
- Click the Actions button next to your new theme and select Publish.
- Publish Button:
- A confirmation window will pop up. Click Publish to make the new theme live.
- Your old theme will be moved to the Theme Library, where you can access it if needed.
Theme Library
The Theme Library is where all your uploaded themes are stored. You can keep multiple themes here for different seasons or promotions.
- Accessing the Theme Library:
- Go to Online Store and then Themes.
- Scroll down to find your Theme Library.
- Managing Themes:
- You can easily switch back to an old theme or try out new themes without losing your customizations.
By following these steps, you can ensure your Shopify store reflects your brand perfectly and provides a seamless shopping experience for your customers. Next, we'll explore advanced theme management techniques to keep your store looking fresh and up-to-date.
Advanced Theme Management
Managing your Shopify themes is crucial for keeping your store fresh and engaging. Let's dive into some advanced techniques for theme management, including how to handle multiple themes, schedule seasonal changes, and maintain your themes efficiently.
Multiple Themes
Shopify allows you to keep multiple themes in your Theme Library. This is useful for various reasons:
- Testing and Feedback: You can test a new theme without affecting your live store. Use the Preview option to see how it looks and get feedback by sharing a preview link.
- Seasonal Themes: Keep different themes for various seasons or promotions. For example, you might have a holiday theme ready to go live in December.
Seasonal Changes and Theme Scheduler
Changing your store's look for different seasons or events can boost engagement. The Shopify Theme Scheduler helps you automate these changes:
- Download the Theme Scheduler: Install it from the Shopify App Store.
- Set Up Your Schedule: Choose the theme you want to publish and set the date and time.
- Automate Your Changes: The scheduler will automatically switch themes at the specified time, ensuring a smooth transition.
Theme Updates and Maintenance
Keeping your theme updated is essential for security and performance. Here's how to do it:
- Check for Updates: Regularly check if your theme developer has released an update.
- Backup Your Data: Always back up your current theme before updating. This can be done by duplicating the theme in your Theme Library.
- Apply Updates: Follow the developer's instructions to update your theme. This usually involves uploading a new ZIP file.
Version Control
Version control helps you keep track of changes and revert to previous versions if needed:
- Duplicate Themes: Before making major changes, duplicate your theme. This serves as a backup.
- Document Changes: Keep a log of any customizations or changes you make. This will help you troubleshoot issues later.
Troubleshooting Common Issues
Sometimes, things don’t go as planned. Here are some common issues and how to solve them:
Upload Errors
If you encounter errors while uploading a theme, here are some steps to troubleshoot:
- Check the ZIP File: Ensure your theme file is in ZIP format and contains all necessary files. For example, the layout/theme.liquid file is crucial.
- File Size: Make sure the file size does not exceed Shopify's limits.
Compatibility Problems
Themes might not always be compatible with your store:
- Check Requirements: Ensure the theme meets Shopify’s requirements, such as being compatible with Online Store 2.0.
- Test on Staging Site: Use a staging site to test the theme before making it live.
Support Channels
When in doubt, seek help:
- Contact Theme Developer: Most theme developers offer support. Reach out to them if you face any issues.
- Shopify Support: Shopify’s support team is also available to help with theme-related problems.
By mastering these advanced theme management techniques, you can keep your Shopify store looking fresh and running smoothly. Next, we'll address some frequently asked questions to help you steer the theme uploading process with ease.
Frequently Asked Questions about Uploading Shopify Themes
What file format should my theme be in?
Your theme file must be in .zip format. This compressed file format ensures that all necessary components of your theme are packaged together.
Pro Tip: If you encounter errors during upload, double-check that the .zip file includes all required files, such as the layout/theme.liquid template. Missing files can cause upload failures.
How do I switch back to an old theme?
Switching back to an old theme is simple:
- Login to Shopify Admin: Go to your Shopify admin page.
- Steer to Themes: Click on Online Store and then Themes.
- Find Your Old Theme: Scroll down to the Theme Library section.
- Publish the Old Theme: Click Actions next to the theme you want to revert to and select Publish.
This will make your old theme live again.
Fact: Shopify allows you to keep multiple themes in your theme library, making it easy to switch back and forth as needed.
Can I preview a theme before fully applying it?
Yes, you can preview a theme before applying it to your live store. This helps you see how the theme will look and function with your existing content.
Steps to Preview a Theme:
- Steer to Themes: From your Shopify admin, go to Online Store and then Themes.
- Explore Themes: In the Theme Library, find the theme you want to preview.
- Click Actions: Next to the theme, click Actions and then Preview.
You can also share this preview with others to gather feedback.
Statistic: 88% of shoppers won’t return to a store after a bad user experience, so previewing themes is crucial to ensure a smooth transition.
By addressing these frequently asked questions, we hope to make the process of uploading and managing Shopify themes as seamless as possible.
Conclusion
In this guide, we've walked you through the essentials of how to upload a theme to Shopify. From understanding the importance of themes to the step-by-step process of uploading and customizing them, we've covered it all.
Recap:
- Preparation: Ensure your theme file is in .zip format.
- Access Shopify Admin: Steer to Online Store > Themes.
- Upload Theme: Use the Upload theme button to add your new theme.
- Customize and Preview: Make necessary adjustments and preview the theme before publishing.
- Publish: Once satisfied, click the Publish button to make the theme live.
Best Practices:
- Regular Backups: Always back up your theme before making significant changes. You can manually export your theme or use Shopify's duplicate feature.
- Preview Thoroughly: Use the preview feature to ensure your theme looks and functions as expected. 88% of shoppers won’t return after a bad user experience.
- Seek Feedback: Share previews with team members or trusted customers to gather feedback before making the theme live.
First Pier Expertise:
At First Pier, we specialize in helping businesses make the most out of their Shopify stores. Whether you need assistance setting up a new theme, customizing an existing one, or troubleshooting issues, our team of experts is here to help.
Ready to take your Shopify store to the next level? Start selling with Shopify and First Pier today. Let's build an online store that truly represents your brand and resonates with your customers.
Your success is our success. Let’s grow together with a custom Shopify theme.


.png)
.png)

